
You'll need specific tools and methods to properly test glove resistance, including universal testing machines like the Shimadzu EZ-LX and specialized probe equipment. Start by checking physical properties such as puncture resistance using a blunt probe at 90° angles, and cut resistance through standardized testing methods like EN 388 or ANSI/ISEA 105. Don't forget to test chemical resistance and barrier integrity through water leak tests. Follow industry standards including ASTM, FDA, and EN regulations while maintaining proper environmental conditions during testing. Understanding the complete testing process will guarantee your gloves meet all safety requirements and performance standards.
Essential Glove Testing Standards

In accordance with stringent medical regulations, glove testing follows several key international standards that guarantee user safety and product reliability.
ASTM standards form the backbone of testing protocols, with specific requirements for different glove materials. ASTM D3577 governs rubber surgical gloves, while D6319 addresses nitrile gloves, and D5250 covers PVC gloves. Independent ANSI-accredited laboratories must conduct all required testing for medical gloves.
When you're evaluating gloves, you'll need to take into account the European EN 455 standards, which cover vital aspects like freedom from holes, physical properties, and biological safety. These standards include essential tests for water tightness and break resistance that you can't ignore.
The FDA adds another layer of oversight by requiring 510(k) premarket approval and maintaining strict manufacturing controls through GMP compliance.
You'll also encounter specialized standards depending on your specific needs. If you're working with chemicals, you'll need to follow OSHA's standards for chemical-resistant gloves.
For cleanroom applications, you'll want to reference IEST RP-CC005.4, while electrical work requires compliance with OSHA 1910.137.
Each standard guarantees you're using gloves that meet specific safety and performance requirements for your application.
Testing Equipment Requirements
Testing equipment demands specific requirements to guarantee accurate and reliable glove evaluations. Your testing equipment must be versatile enough to handle electrical rubber gloves from Class 00 to Class 4, while accommodating various glove lengths from 10.5" to 18" and different cuff styles.
You'll need clothespin-style holders that won't damage the gloves or sleeves during testing. Cool, dry storage must be available near the testing area to properly maintain gloves between tests.
Your equipment should comply with ASTM D120, F496, and IEC 60903 standards, confirming it can test gloves to the required voltage and time specifications. You'll also want capability to test additional items like sleeves, blankets, line hoses, and line jumpers according to these standards.
Before using the equipment, you must prepare gloves through proper washing, drying, and visual inspection. You'll need to inflate and roll gloves to check for damage, and perform air testing as specified in ASTM F496.
When conducting electrical tests, you'll test gloves to their maximum field use voltage every six months. Your equipment should include date stamping capabilities using fade-resistant ink.
To maintain compliance, you'll need to keep detailed test reports and confirm all testing meets OSHA requirements under 29 CFR 1910.137.
Puncture Resistance Testing Methods
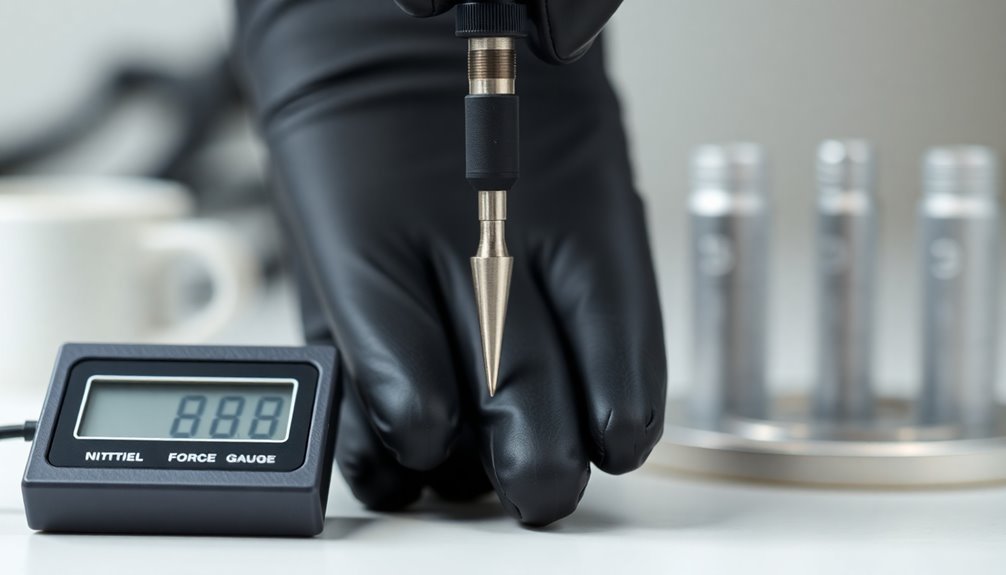
You'll find that puncture resistance testing relies on a standardized process where a 4mm probe penetrates test materials at 100mm/min while measuring the required force.
Your testing setup must secure the material between two plates while maintaining a precise 90-degree angle for the probe to guarantee accurate measurements.
When interpreting your results, you'll need to classify the resistance level based on the lowest force value among your four test samples, following the EN388:2016 scale of 1-4 based on specific Newton thresholds.
For ANSI/ISEA testing standards, twelve test repetitions are required to calculate the average force needed for penetration.
Standard Testing Procedures
Two major standards dominate the field of glove puncture resistance testing: EN 388 and ANSI/ISEA 105. Both standards follow similar testing procedures, where you'll find a blunt probe penetrating the glove material at a 90° angle while moving at 100 mm/min. The material is held between two plates during testing, and the force required for puncture is measured in Newtons. Testing typically requires twelve separate puncture tests to ensure accurate results.
You'll notice key differences in how these standards rate puncture resistance. EN 388 uses a 1-4 scale, while ANSI/ISEA 105 employs a 1-5 scale. Both measure forces from 10 to 150 Newtons but categorize them differently. When you're selecting gloves, you'll see these ratings clearly marked according to the standard used.
It's important to understand that these tests are designed specifically for industrial puncture hazards, like wood splinters or fine wire strands. You'll need to take into account different standards, such as ASTM F2878, if you're looking for needlestick protection.
To guarantee you're getting the right protection, you should conduct field tests with your specific workplace hazards in mind, as different materials offer varying levels of puncture resistance.
Equipment Setup Guide
Before starting any puncture resistance test, proper equipment setup stands as the foundation for reliable results. You'll need to guarantee your testing machine is equipped with a steel stylus of HRC 60 hardness, featuring a 4.5 mm diameter and a 1 mm tip radius. The load cell must have a 500 N capacity for accurate force measurements. Due to their cutting and friction characteristics, medical needles require special consideration during testing.
For sample preparation, you'll want to cut 40 mm diameter specimens from the palm area of your gloves. Mount these carefully on the lower support, which features a 20 mm diameter hole.
Your universal testing machine, such as the Shimadzu EZ-LX, should be configured with Trapezium X software for precise data collection.
Key setup components include:
- Testing speed set to 100 mm/min for blunt tip tests or 500 mm/min for needle puncture tests
- Sample positioned perpendicular to the puncture probe
- Lower support firmly secured to prevent sample movement
When testing different materials, consider their unique characteristics. Multiple layer materials may require special attention, and environmental conditions can affect results.
Remember to verify that your needle selection (21, 25, or 28 gauge) matches your testing requirements when conducting hypodermic needle resistance tests.
Interpreting Test Results
With proper equipment setup complete, understanding how to interpret test results becomes the next step in glove resistance testing. You'll need to measure the maximum force required for puncture in newtons, conducting multiple tests at a 90° angle with a pen-like probe moving at 100mm/min. The testing setup uses two plates to secure the material during penetration testing.
| Test Parameter | Interpretation Guide |
|---|---|
| Force Reading | Record maximum force in newtons before penetration |
| Test Location | Verify probe hits different areas for valid sampling |
| Data Variation | Note any substantial deviations between test points |
| Material Impact | Consider thickness and hardness influences |
| Final Rating | Convert newton measurements to standard scales |
You'll find that ANSI/ISEA 105 and EN 388 use different rating scales, with ANSI/ISEA ranging from 1-5 and EN 388 from 1-4. When interpreting results, you must account for material variability, as weave patterns can notably affect readings. Your final rating should reflect the average force from multiple test points, typically ranging from 10 to 150 newtons. Remember to distinguish between blunt tip and needle puncture results, as they'll vary based on different testing methods and material responses. Document any unusual variations that might indicate inconsistent material quality or testing anomalies.
Material Performance Analysis
Understanding glove material performance requires systematic testing across multiple attributes. You'll need to evaluate key properties like tenacity, which measures friction on inclined planes, and snugness, calculated by volume differences between glove and hand. Increasing glove thickness leads to reduced grip strength capabilities.
For tensile strength testing, you'll use the ASTM D412 standard with dumbbell-shaped samples to determine breaking points and elongation capabilities.
Material performance varies substantially based on composition and enhancements. Modern gloves often exceed minimum requirements, incorporating advanced features for improved protection:
- Biodegradable materials using ascorbic acid from maleate epoxidized natural rubber blends
- Bio-fillers like sago starch in natural rubber and XNBR films
- Nanofillers combining SiO2 and ZnO for enhanced physical properties
You'll want to conduct pressure decay testing to verify integrity, following ISO 14644 Part 7 standards. This involves pressurizing to 1000 Pa and monitoring for leaks using calibrated hole methods.
When analyzing results, consider that different materials (suede leather, smooth leather, cotton) affect grip strength differently, and accelerated aging tests can help predict end-of-shelf-life performance. Pay special attention to post-aging requirements, as latex gloves must maintain at least 14 MPa tensile strength and 500% elongation.
Chemical Exposure Testing Protocols

Material performance analysis intersects directly with chemical exposure testing, where glove integrity faces its most rigorous challenges. When you're testing glove resistance, you'll need to focus on two critical aspects: permeation and degradation testing. Three specimens from each glove's palm area undergo standardized penetration analysis during testing.
For permeation testing, you'll measure breakthrough time according to EN 374:2016 standards, which indicates how long it takes for hazardous chemicals to penetrate through the glove material.
The results are classified in performance levels from 0 to 6, with testing methods outlined in EN 16523-1:2015 and ASTM F739. You'll measure permeation rates in mg/m²/sec, considering glove thickness as a vital factor.
When conducting degradation testing, you'll evaluate physical changes in gloves after chemical exposure.
The results are rated from Excellent to Poor, helping you determine how well the glove material withstands specific chemicals. You'll follow ASTM standards and North Safety Products testing protocols to assess degradation levels.
The thickness and material type greatly influence resistance levels, and you can refer to color-coded guides for general recommendations. For unlisted chemicals, you'll need to seek technical assistance for specific data.
Quality Control Testing Steps
Proper quality control testing follows a systematic sequence of steps to guarantee glove safety and reliability. You'll need to start with dimensional testing to verify the glove's basic measurements, including length, width, and thickness against predetermined specifications. This foundational check certifies consistent sizing and comfort for end-users.
Next, you'll conduct barrier integrity testing through water tightness checks. You'll fill each sampled glove with one liter of water and observe it for two minutes to detect any leaks. The number of gloves you'll test depends on your lot size and AQL requirements, typically aiming for 1.5 or lower in medical applications.
For thorough quality assurance, you'll need to perform these essential tests:
- Material strength evaluation using tensile testing on dumbbell-shaped samples
- Accelerated aging tests to verify shelf-life durability
- Degradation resistance checks for chemical protective qualities
Your final step involves analyzing results against AQL standards. If you find more defective gloves than your AQL allows, you'll need to reject the entire lot.
Medical-grade gloves require stricter standards, so you'll need to maintain meticulous testing procedures throughout the process.
Data Collection and Management

Effective data collection and management require three core components for glove testing: pressure decay analysis, chemical permeation results, and statistical validation.
You'll need to carefully monitor pressure decay curves at various inflatable pressures below 1000 Pa for both closed and open systems. It's crucial to use high-precision pressure transmitters and minimize statistical deviation in your collected data.
For chemical permeation testing, you must place samples in permeation cells and follow ASTM D 6978 standards when testing medical gloves against chemotherapy drugs.
When managing your data, you'll want to maintain consistent formatting and organize your findings using clear, structured documentation.
Don't forget to test a minimum of four gloves for protein content assessment, as required by CEN455-3. You should use the Automatic Glove Tester for precise positive pressure decay measurements, as it offers high reproducibility and reduces false positives.
Your statistical analysis must be thorough and deviation-free. Remember to review feedback forms and examine trial glove samples for cut resistance and durability.
Always verify equipment integrity before testing and maintain accurate records of all test results.
Safety Compliance Validation
Building upon your data collection practices, safety compliance validation requires adherence to multiple regulatory standards. You'll need to understand ASTM, ISO, and EN standards that govern different types of gloves.
Each standard specifies requirements for tensile strength, puncture resistance, and barrier integrity that you must validate through rigorous testing.
To guarantee thorough compliance validation, you'll want to focus on these vital testing areas:
- Tensile strength and elongation tests using controlled stretching equipment to measure maximum force tolerance and flexibility
- Puncture resistance evaluation with a 1mm steel stylus to determine force requirements according to ANSI and EN scales
- Viral penetration and biocompatibility assessments to verify barrier effectiveness and skin safety
Your testing protocols should align with specific standards based on glove type and intended use. For medical gloves, you'll follow ISO 11193-1 and EN 455, while electrical gloves require compliance with ASTM D120-21.
Don't forget to maintain detailed documentation of all test results, including certification dates and inspection records. Regular testing schedules are particularly essential for high-voltage electrical gloves, where you'll need to perform cleaning, visual inspection, and electrical testing.
Frequently Asked Questions
How Long Do Gloves Typically Maintain Their Rated Resistance Level During Regular Use?
You'll find most gloves maintain their rated resistance for up to 8 hours, but it's highly variable. You should replace them sooner if you notice any degradation signs or after significant chemical exposure.
Can Gloves Be Retested After Washing or Cleaning Procedures?
Yes, you can retest gloves after washing and cleaning them. In fact, it's required to clean gloves before retesting. Just make certain you've used approved cleaning agents that won't damage the insulating properties.
What Temperature Conditions Affect Glove Resistance Testing Accuracy the Most?
You'll find body temperature and heated chemicals impact your glove resistance testing most substantially. Temperature increases can reduce breakthrough times by 33% and accelerate permeation rates, affecting your test accuracy dramatically.
Do Different Brands Using Identical Materials Show Consistent Test Results?
You'll find that brands using identical materials often show minor variations in test results due to manufacturing processes, quality control differences, and slight variations in material composition, even when following the same standards.
How Does UV Exposure Impact Long-Term Glove Resistance Performance?
You'll notice significant degradation in your gloves' resistance over time with UV exposure. It'll reduce tensile strength by 40% within 24 hours, compromising both latex and nitrile materials' protective capabilities long-term.
In Summary
You'll find glove testing is essential for workplace safety and compliance. By following standardized testing methods and maintaining proper documentation, you're ensuring maximum protection for end-users. Don't skip regular quality checks and material performance analysis – they're your best defense against potential hazards. Remember, you're not just testing equipment; you're safeguarding lives through systematic validation and continuous monitoring of protective gear.


Leave a Reply