Installing anti-static floor tiles requires careful preparation and precise execution. You'll need to start by testing your subfloor for moisture content (≤8%) and maintaining room temperature between 20-25°C with 40-60% humidity. Clean and level your surface, then apply conductive adhesive using notched trowels. Install copper grounding strips (1 per 1000 sq ft) in a cross-paving pattern before laying tiles from the center outward. Roll tiles within 30 minutes using a 150-pound roller for proper embedding. Once complete, test the electrical resistance to verify readings fall between 1.0 x 10E5 to 1.0 x 10E8 ohms. The technical details that follow will guarantee your installation meets professional standards.
Required Tools and Materials

Before beginning your anti-static floor tile installation, you'll need several specialized tools and materials to guarantee proper conductivity and longevity.
Start with high-quality acrylic emulsion adhesives like GroundTack, which provide essential conductive properties for ESD protection. You'll need copper grounding strips, planning to install one strip per 1000 square feet, assuring at least 2 inches contact with GroundBridge strips. Glue-free options are also available for installations where traditional adhesives aren't suitable or desired.
For accurate measurements and layout, gather steel measuring tapes and levels. You'll require notched trowels for spreading adhesive evenly, maintaining the recommended coverage rate of 180-250 square feet per gallon, depending on your subfloor's porosity.
Include chalk lines in your toolkit to mark installation patterns and assure straight alignments. For cutting and fitting tiles, you'll need tile cutters, nippers, and carborundum stones to achieve clean edges.
Don't forget spacers or rely on integral spacer lugs to maintain uniform joints between tiles. Finally, you'll need sectioned rollers for the critical step of embedding tiles firmly into the adhesive – you'll use these to roll in perpendicular directions for proper adhesion.
Site Preparation Steps
Proper site preparation makes or breaks your anti-static floor tile installation. Start by thoroughly evaluating your subfloor's condition, confirming it's clean, flat, and dry.
You'll need to repair any cracks or uneven areas using latex-fortified cementitious underlayment that meets load requirements. Check that moisture content doesn't exceed 8%. The ideal construction temperature range should be between 10-35°C.
For concrete subfloors, you must implement proper moisture-proofing by laying EPE damp-proof cloth and conducting a closed water experiment to verify there's no seepage.
Verify that all pre-buried wires and water pipes are secure and properly positioned.
To establish your installation layout, mark the center points of all four walls and snap chalk lines between opposite walls, creating an intersection at the room's center.
Lay out loose tiles from the centerline to determine proper spacing and edge cuts. You'll need to locate the floor's lowest point and draw a horizontal guideline for your first row.
Before proceeding with installation, confirm that doors and windows are properly installed and closed.
Check that the reserved height at door bottoms meets standards, and confirm all surfaces are free from contaminants like paint, oil, or old adhesive residue.
Environmental Controls Before Installation
Successful anti-static tile installation demands strict environmental control protocols. You'll need to monitor and manage specific conditions before proceeding with the installation. Start by maintaining the installation area at 20-25°C with relative humidity between 40-60% for at least 24 hours before testing. Store tiles flat in the installation area to acclimate them to these conditions.
Test your subfloor thoroughly using ASTM standards. You'll want to conduct F-2170 in-situ probe tests for relative humidity (target: below 75%) and F-1869 calcium chloride tests for vapor transmission (target: below 3 pounds/1,000 sq ft). Don't skip the ASTM-D4263 plastic sheet test for visual moisture assessment.
| Parameter | Control Measure |
|---|---|
| Temperature | 20-25°C constant |
| Humidity | 40-60% RH |
| Moisture Barrier | Install if site conditions require |
| Underlayment | Min 3mm cementitious, conductive |
Your underlayment choice is vital – guarantee it's at least 3mm thick and made of conductive or dissipative materials. Check that it's free from ortho-phthalates and other substances that might interfere with conductivity. If you're working with new concrete, you must allow a 90-day curing period before installation. Remember to evaluate site topography and water table conditions to determine if additional moisture barriers are necessary.
Grounding System Layout
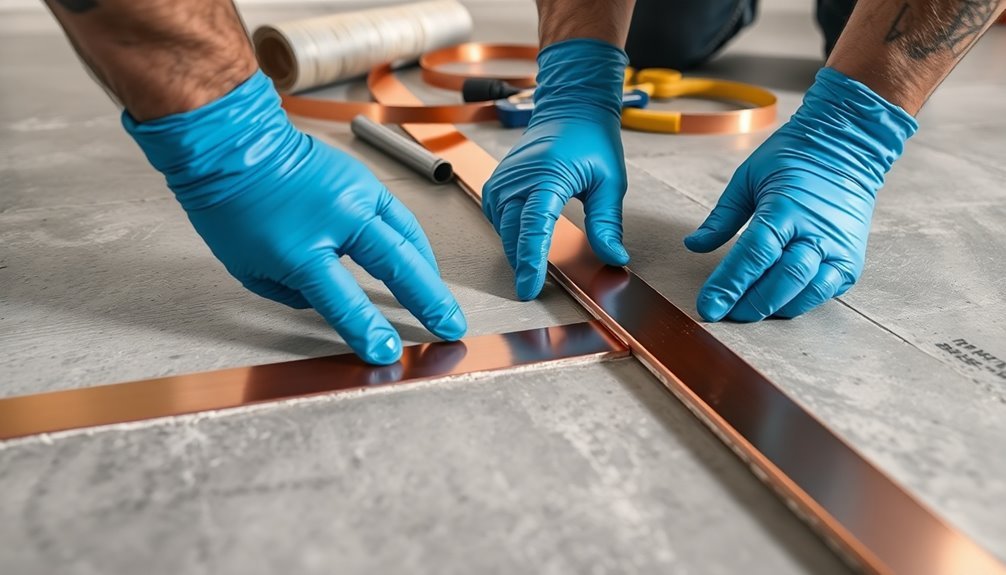
You'll need to map out your copper strip positioning before installation, placing one strip per 1000 square feet with strategic access points to ground connections throughout the space.
Your grounding plan should identify the nearest electrical outlets, building steel, or dedicated grounding bars that you'll use as connection points for each copper strip. The low voltage conductivity through properly grounded systems helps minimize risk of electrical shock to personnel.
When installing in larger spaces, you can create a ring earthing system by connecting multiple copper strips in a continuous loop around the perimeter, ensuring thorough static dissipation across the entire floor area.
Copper Strip Positioning Strategy
Planning your copper strip layout forms the foundation of an effective anti-static flooring system. You'll need to position copper strips approximately 1.2 meters apart in a cross-paving pattern, guaranteeing you install at least one strip for every 1,000 square feet of ESD flooring.
Remember that each room requires a minimum of two strips, regardless of size.
Position your copper strips strategically along base walls or columns where you'll have access to grounding points. You'll find it most effective to connect the strips to electrical outlets, grounding rods, or steel support columns. Direct grounding of the system ensures effective release of static electricity.
When laying out the strips, make certain they'll form a unified conductive underlayment that creates a complete path to ground.
Before installing the strips, you must clean the floor surface thoroughly to remove all debris. When handling the copper strips, work carefully as their edges are sharp.
Apply conductive adhesive directly over the positioned strips, creating a secure bond with the floor tiles. Your finished layout should integrate seamlessly with the conductive elements in your ESD floor tiles, including carbon or metal-coated particles, to effectively direct static electricity downward to ground.
Ground Point Access Planning
With your copper strips properly positioned, the next step focuses on establishing reliable ground point connections. You'll need to start with a thorough site analysis, including soil resistivity testing using the Wenner 4-point method. This data helps determine the most conductive layers for your grounding system design. Ground bus bars must be mounted using insulated standoffs for proper isolation.
Remember that NEC requires a minimum of two grounding electrodes unless one achieves less than 25 ohms resistance to earth. When installing multiple electrodes, space them at twice the rod length to prevent overlap. You'll need to measure ground resistance after installation to verify compliance with the 25-ohm requirement.
Your grounding electrode system should integrate various components, including the grounding electrode conductor (GEC), main bonding jumper, and appropriate electrodes. Install the GEC at the service entrance, ensuring it's properly routed with ungrounded conductors.
For anti-static flooring specifically, you'll need to connect your copper strips to this grounding system using conductive adhesive. Don't forget to conduct post-installation resistance measurements to confirm your system meets specifications. If measurements indicate higher resistance than required, you may need to install additional electrodes.
Ring Earthing Installation Method
Proper ring earthing installation begins with excavating a continuous trench around your building's foundation perimeter. You'll need to place a bare conductor in this trench, ensuring it maintains direct contact with the soil rather than sitting in gravel or aggregate material. Earth enhancing compounds can be added to improve the soil's conductivity when needed.
Don't skip this vital step, as proper soil contact directly impacts the system's effectiveness.
Next, you'll need to install four vertically arranged conductors at widely spaced intervals around the loop. These serve as your connection points for the anti-static flooring system.
If your building has reinforcing rods in its concrete work, connect your earthing system to these for enhanced grounding capability.
Once you've laid the conductor, you'll connect copper grounding strips from your flooring's underlayment to the earth ground points. This creates a complete path for static electricity to flow safely to ground.
Before proceeding with floor installation, you must test the resistance measurements of your earthing system to validate its effectiveness.
Adhesive Selection and Testing
You'll need to select a conductive adhesive that meets all manufacturer specifications and ASTM standards to guarantee proper electrical conductivity between the tiles and grounding system.
Before applying adhesive across the entire floor, install a test strip of tiles in a small area to verify both bonding strength and conductivity readings. For optimal coverage, use a ¼ foam roller to apply the adhesive evenly across the surface.
Once the test strip meets performance requirements, you can proceed with the full installation using your chosen adhesive and maintaining consistent application techniques.
Conductive Adhesive Properties
Selecting the right conductive adhesive is vital for a successful anti-static floor installation. You'll need an adhesive that's compatible with ESD carpet tiles, vinyl tiles, and PVC flooring while meeting DIN EN 13 415 conductivity standards. The adhesive should be solvent-free and designed for interior applications on properly prepared and primed surfaces.
Your chosen adhesive must demonstrate high initial and final strength through tensile, shear, and peel tests. It's important to understand that the adhesive forms a conductive ground plane beneath your ESD tiles, channeling static charges to ground.
You'll notice that environmental conditions affect the adhesive's performance – higher humidity increases conductivity, while dry conditions reduce it.
When evaluating adhesive properties, confirm it's the most conductive element in your flooring system, as the overall system resistance equals or exceeds the most resistive component. The adhesive should spread easily and exhibit powerful thread-formation characteristics.
You'll want to verify its performance through multiple test patterns and microscopic inspection. Remember that exposure to environmental factors like hydrogen sulfide can impact adhesion strength, so choose an adhesive that maintains its properties under varying conditions.
Test Strip Installation
A test strip serves as your initial proving ground for anti-static floor installation success. You'll need to select the right conductive adhesive and properly place copper grounding strips to guarantee peak performance. Several adhesive options are available, including StaticSmart ESDvantage, GroundTack, and GZ C2000-R, each offering specific benefits for your installation.
| Adhesive Type | Key Properties |
|---|---|
| StaticSmart ESDvantage | Solvent-free, acrylic conductive |
| GroundTack | Pressure sensitive with Thunderon Matrix |
| GZ C2000-R | Water-resistant, non-hazardous |
| Armstrong S-202 | Static dissipative specific |
| Conductive Adhesives | Firm bond for various surfaces |
When installing copper strips, place one strip per 1,000 square feet of floor space. You'll need to extend each strip 18 inches on the floor and 6 inches up the wall, applying additional adhesive over the floor section. Guarantee at least 2 inches of copper strip contacts the GroundBridge or conductive subfloor. Let the adhesive dry to touch before laying tiles, and avoid rolling load traffic for 72 hours after installation. Remember to clean any adhesive residue with a damp cloth using mineral spirits.
Floor Pattern Planning
Proper floor pattern planning creates the foundation for a successful anti-static tile installation.
You'll need to start by identifying the center point of each wall and snapping chalk lines between opposite walls to create an intersection at the room's center. Divide the room into smaller 2' x 3' grids by adding parallel lines to your center lines.
Before laying tiles, check that your room is square by measuring diagonals, and verify your floor is level. You'll want to adjust your center lines if you find that you'll need cuts smaller than half a tile at the walls.
Start by laying out loose tiles along your center lines in both directions, using spacers to maintain uniform joints. Orient your tiles consistently to guarantee proper interlocking, and don't forget to undercut door jambs for a smooth fit.
You'll achieve the best results by working from the center outward, leaving perimeter tiles for last. When cutting tiles, use a tile cutter for straight cuts and nippers for curves. Remember to maintain a 1/4" gap between tiles and walls, and use a dead-blow hammer to lock tiles together without damaging the interlock system.
Installing Ground Strips
With your floor pattern established, you'll now need to install ground strips to guarantee effective static control. Start by identifying grounding points near electrical outlets along walls or columns. You'll need one strip per 1000 sq. ft., with a minimum of two strips per room.
| Component | Specification |
|---|---|
| Strip Width | 2 inches |
| Thickness | 1.4 mil (2.6 with adhesive) |
| Wall Coverage | One-third of strip length |
| Floor Coverage | Two-thirds of strip length |
Begin installation from the room's center, working outward. Clean the subfloor thoroughly to prevent debris from affecting the installation. When applying the copper strips, peel back the protective layer and press firmly against the surface, running the strip 24 inches onto the floor and up the wall to reach the grounding point.
You'll need to ascertain proper contact between the strips and your GroundBridge or conductive subfloor, maintaining at least 2 inches of overlap. Handle the strips carefully, as edges can be sharp. For larger installations, add one strip per 3000 sq. ft. beyond the minimum requirement to maintain ideal static dissipation properties.
Adhesive Application Techniques
Selecting and applying the right adhesive forms the foundation of a successful anti-static floor installation. You'll need to use conductive adhesives specifically designed for anti-static flooring, guaranteeing they're compatible with your subfloor material and existing coatings.
Before applying adhesive, prepare your subfloor thoroughly – it must be clean, dry, and free of contaminants. If you're working with a highly porous surface, apply a compatible primer first.
Use the manufacturer's specified trowel size to spread the adhesive evenly in sections, avoiding overlap that could cause uneven drying. You'll want to maintain a temperature of around 70°F and control humidity levels during installation.
After spreading the adhesive, wait approximately 45-60 minutes until it's dry to touch before placing tiles. Don't rush this step – proper drying time is vital for adhesion.
If you need quick installation or future removal options, consider releasable adhesives or dry adhesive systems. Clean any adhesive residue from tile surfaces immediately using mineral spirits or recommended cleaners.
Remember to restrict heavy traffic and rolling loads during the specified curing period to guarantee proper bonding.
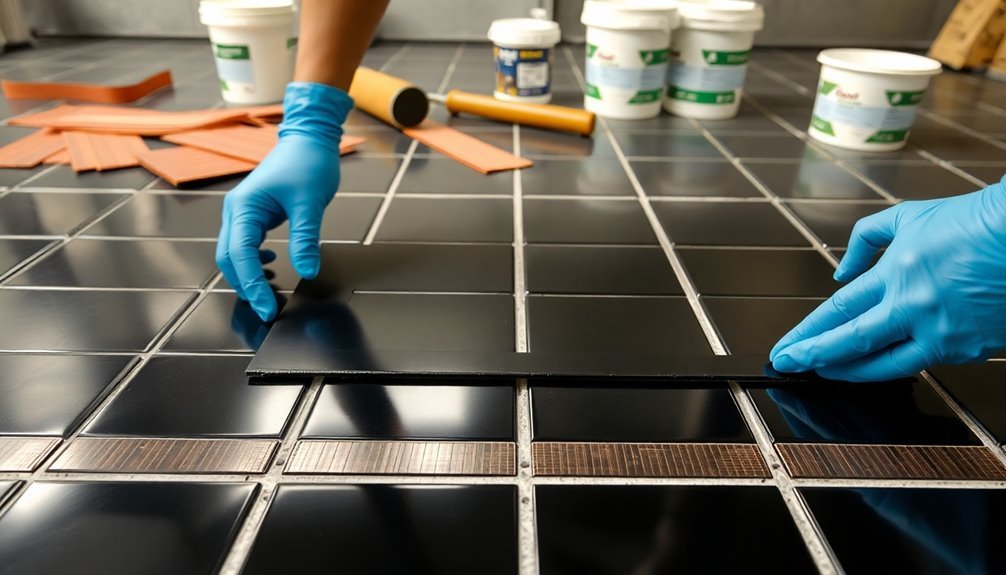
Tile Placement Methods
Once you've applied the adhesive correctly, accurate tile placement becomes your next key focus. Start from the center of the room and work within one grid at a time, completing each section before moving to the next.
You'll need to set each tile individually using a slight twisting motion to guarantee proper adhesion and alignment. As you lay each tile, insert spacers or maintain equal joints between them for consistent spacing.
When you encounter the copper grounding strips, make sure they remain visible by telegraphing after laying the tiles. For perimeter tiles, leave a 1/4 inch gap between the tile and wall to allow for expansion.
You'll need to cut these border tiles to fit – measure carefully and mark with a pencil before making straight or diagonal cuts with a tile cutter.
Don't forget to verify shade lot numbers before installation to maintain consistency in each area. If you're working with specialized anti-static flooring types (ASF, DIF, or ECF), follow their specific installation requirements.
Remember to avoid rolling load traffic for at least 72 hours after installation to allow proper curing and adhesion.
Rolling and Embedding Process
You'll need to select the right roller weight for your specific tile type, ranging from 50 kg for conductive adhesives to 150 pounds for ESD vinyl tiles.
To achieve proper embedding, roll the tiles in perpendicular directions while applying consistent pressure within the adhesive's working time.
Make certain you're following a systematic rolling pattern that guarantees 80-90% adhesive coverage on the back of each tile for ideal electrical conductivity.
Proper Roller Equipment Selection
During the installation of anti-static floor tiles, proper roller equipment plays an important role in achieving ideal bonding and conductivity. You'll need a sectioned roller weighing approximately 150 pounds (68 kg) to guarantee tiles are firmly embedded in the adhesive. This weight is vital for achieving the required 80-90% adhesive transfer to the tile backing, which ensures both proper bonding and electrical conductivity.
When selecting your roller equipment, consider these key specifications:
- Use a sectioned roller design that distributes pressure evenly across the tile surface
- Confirm the roller weight meets the 150-pound requirement for best embedding
- Choose equipment that allows for smooth perpendicular rolling motions
- Select a roller width appropriate for your tile dimensions
- Verify the roller's compatibility with your adhesive type
You'll need to roll each tile twice in perpendicular directions within 30 minutes of installation, before the adhesive begins to dry. Remember to maintain consistent pressure throughout the rolling process, and avoid using lighter-weight rollers as they won't provide adequate embedding force.
Keep your roller clean between uses to prevent adhesive buildup that could affect performance.
Rolling Pattern Requirements
With the proper roller equipment in hand, following the correct rolling pattern guarantees ideal tile installation and conductivity.
You'll need to roll each tile section within 30 minutes of installation, using a 100-150 pound roller. Apply even pressure in two perpendicular directions to achieve 80-90% adhesive coverage on the tile's backside.
Don't begin rolling until about 20 minutes after laying the tiles to prevent shifting or bleeding issues.
When laying tiles, carefully drop them into position rather than sliding them. Press adjacent tiles firmly together to ascertain proper alignment.
You'll want to periodically lift tiles to verify proper adhesive coverage during the installation process. The adhesive's working time is approximately one hour, though ambient conditions can affect this timeframe.
After the initial roll, you should perform a follow-up roll about an hour later if needed. Continue checking for any shifting or lifting during the setting process.
You must keep all rolling load traffic off the floor for at least 72 hours after installation to allow proper adhesive curing.
Complete a final roll to confirm there aren't any bonding issues before the adhesive fully sets.
Pressure Application Guidelines
Proper pressure application stands as a critical factor in anti-static tile installation. You'll need to use a 50 Kg or 150-pound roller to guarantee consistent pressure across all tiles.
Begin rolling within 30 minutes of installation, before the adhesive sets, and make sure to roll in perpendicular directions for ideal embedding.
Before applying pressure, let the adhesive sit for approximately 20 minutes to allow solvents to flash off. When laying tiles, avoid sliding them into position and press adjacent tiles firmly together for a tight fit. Use a kneeler board to prevent damaging freshly laid tiles.
Key pressure application steps to follow:
- Roll tiles with a sectioned roller for even pressure distribution
- Check for 80-90% adhesive coverage on tile backsides regularly
- Use a cork smoothing press for initial manual adhesion
- Roll tiles first manually, then with the heavier roller
- Complete perpendicular rolling passes within the 30-minute window
Remember to periodically inspect your work by lifting random tiles to verify proper adhesive coverage.
Clean your roller frequently to prevent debris contamination, and maintain consistent pressure throughout the installation process. Replace worn trowels to guarantee uniform adhesive application across the floor surface.
Quality Control Measures
Quality control measures up to and throughout the installation of anti-static floor tiles guarantee a successful, long-lasting system.
You'll need to verify concrete subfloors by ensuring they're properly cured, meet moisture requirements, and maintain a clean, debris-free surface. If necessary, apply cementitious underlayment that meets floor load specifications.
When handling adhesives, you must use approved conductive types specifically designed for ESD flooring. Test each adhesive batch for electrical resistance before shipment and follow the manufacturer's guidelines for trowel size and spread rate.
You'll want to maintain 80-90% adhesive coverage and regularly check transfer to tile backing.
Material preparation requires you to precondition tiles and adhesive for at least 48 hours in the installation environment. Stack tile cartons upright, never exceeding five high, and verify shade lot numbers match within installation areas.
For grounding requirements, you'll need to install copper strips before applying adhesive and tiles. Place one strip per 1,000 square feet, with a minimum of two per room.
Position them along wall bases or columns near grounding points, and apply adhesive directly over the strips, handling sharp edges carefully.
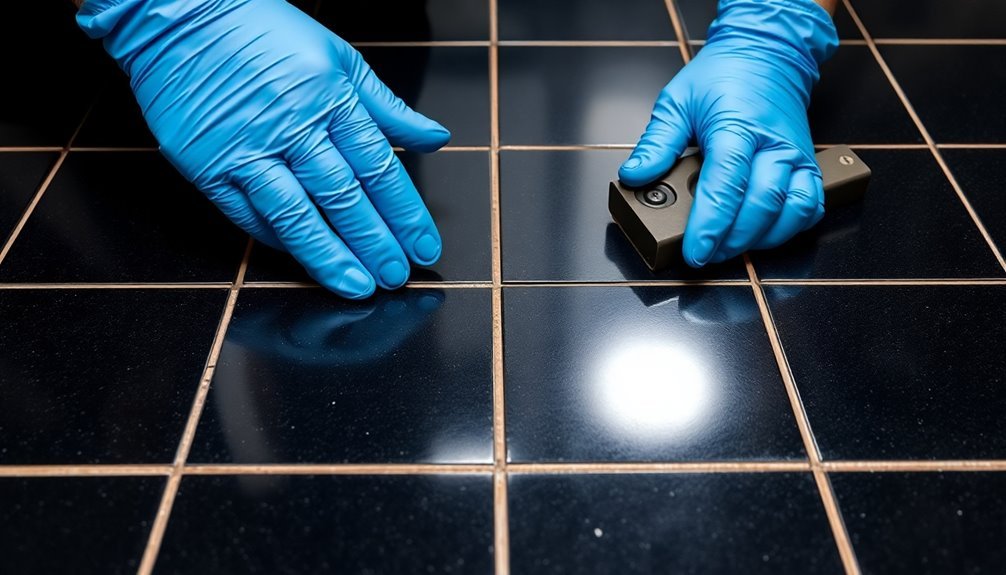
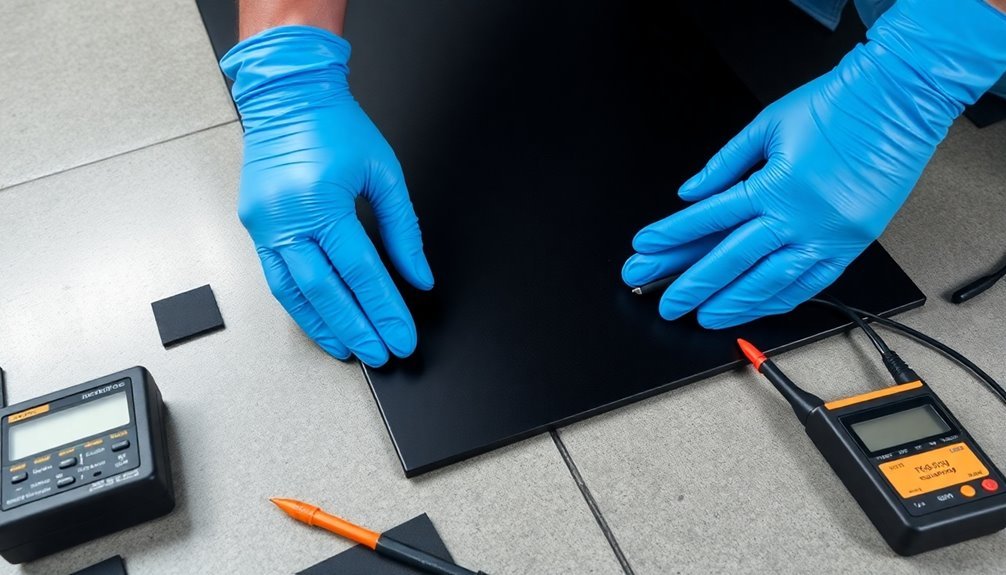
Post-Installation Testing Requirements
Testing anti-static floor tiles after installation requires specific procedures to verify their electrical performance and safety standards.
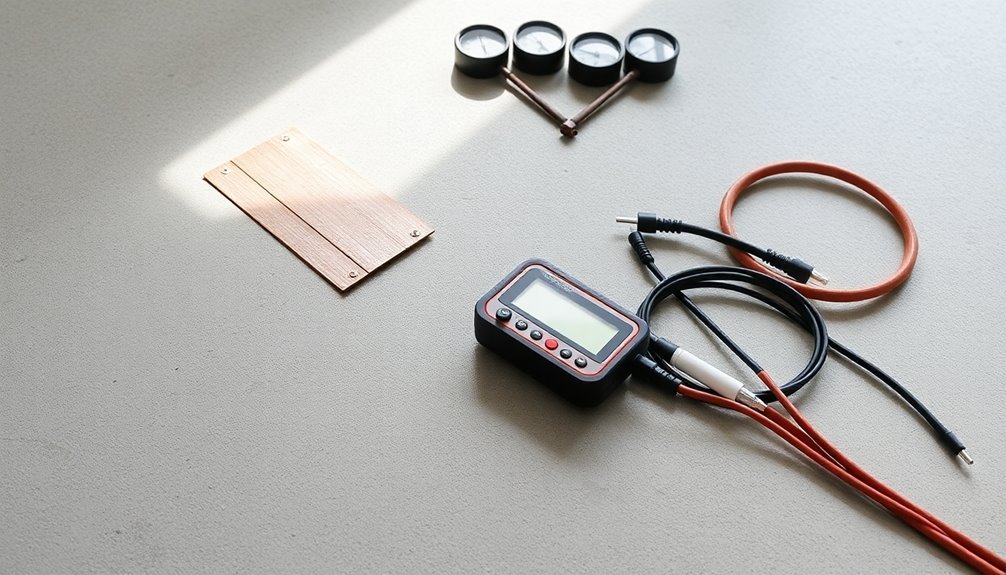
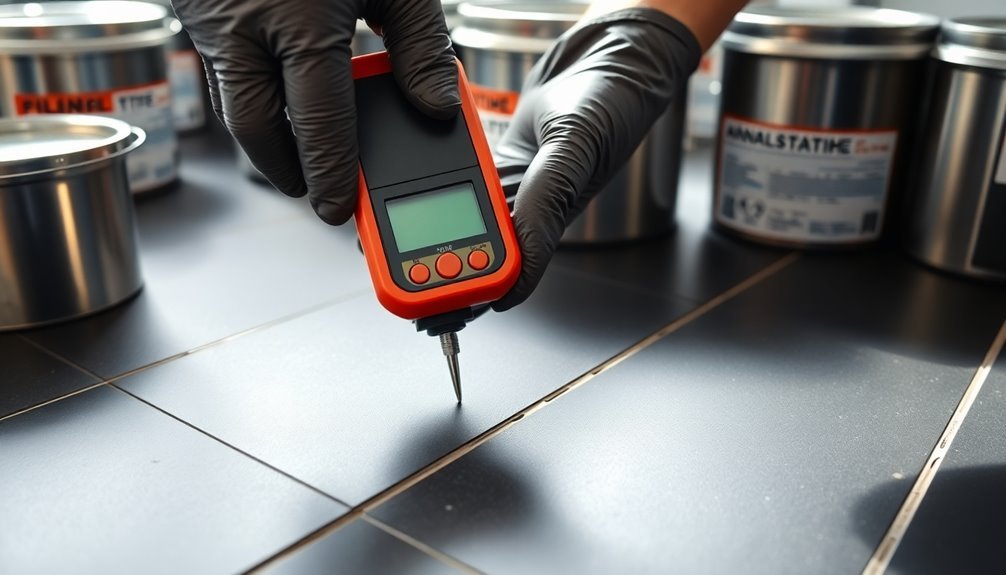
You'll need to conduct both electrical resistance and static generation tests using specialized equipment like resistance meters and voltmeters, following ANSI/ESD STM 7.1 and ANSI/ESD STM 97.2 standards.
To properly test your flooring, apply 10 volts of electricity using two 5-pound probes placed 3 feet apart. You'll want to guarantee the resistance readings fall within your industry's specified range, typically between 1.0 x 10E5 to 1.0 x 10E8 ohms for most applications.
Key testing requirements you must follow:
- Use a megohmmeter or resistance meter to measure electrical resistance according to ASTM F150 standards
- Perform walking tests with specific footwear while using a voltmeter to measure static generation
- Check conductivity measurements against your industry's required specifications
- Document all test results for certification purposes
- Schedule regular retesting to monitor floor performance and deterioration
Remember that proper testing isn't a one-time event.
You'll need to implement periodic retesting to guarantee your anti-static flooring continues to meet safety standards and maintains its effectiveness over time.
Frequently Asked Questions
How Long Does Anti-Static Flooring Typically Last Before Needing Replacement?
You'll find that anti-static flooring lifespans vary greatly: epoxy lasts 5-10 years, polyurethane 10-15 years, micro cement 15-20 years, while vinyl and SPC floors can exceed 20-30 years with proper maintenance.
Can Heavy Equipment Be Moved Across ESD Tiles Without Damaging Them?
Yes, you can safely move heavy equipment across ESD tiles. They're designed to support up to 30,000 lbs and are slip-resistant. Your carts, pallets, and machinery won't damage them during regular movement across the surface.
What Happens if the Building Loses Electrical Grounding Connection?
You'll face serious risks if your building loses grounding: potential electric shocks, fire hazards, damaged electronics, and equipment malfunctions. Your ESD protection won't work properly, leaving sensitive equipment vulnerable to static discharge.
Are ESD Tiles Safe for People With Pacemakers or Medical Devices?
Yes, ESD tiles are safe for you if you have a pacemaker or medical device. They'll actually protect you by preventing static electricity buildup that could interfere with your device's normal function.
Do Cleaning Chemicals Affect the Anti-Static Properties Over Time?
Yes, harsh cleaning chemicals can degrade your anti-static flooring's properties over time. You'll want to use pH-neutral cleaners and avoid bleach, quats, and ammonia to maintain the static-control effectiveness of your floors.
In Summary
You've now completed the complex process of installing anti-static floor tiles. By following each step carefully and maintaining proper environmental controls, you'll have a reliable ESD-protected surface. Don't forget to document your installation process and test results for future reference. Keep monitoring the floor's performance regularly and maintain the recommended humidity levels to guarantee your anti-static flooring continues functioning effectively.


Leave a Reply