
To install anti-static floor strips correctly, you'll need to start with thorough surface preparation and moisture testing. Clean your subfloor completely and repair any cracks or uneven areas. You'll create a 600mm square grid pattern, keeping perimeter strips 150mm from walls, and install copper strips at 20-meter intervals. Use conductive adhesive to embed the strips, connecting one grounding strap for every 1000 square feet of flooring. Don't forget essential tools like a marble cutting saw, megohmmeter, and suction plate device. Proper installation requires careful attention to specific measurements, materials, and testing procedures – factors that can make or break your anti-static flooring's effectiveness.
Pre-Installation Surface Check
Before diving into your anti-static floor strip installation, you'll need to thoroughly assess your subfloor's condition. Start by checking for moisture content, as excess moisture can lead to adhesive failure. You'll want a completely dry surface to guarantee proper bonding. If you're working with new concrete, remember it needs at least 90 days to cure properly.
Don't forget to evaluate environmental factors like water table and drainage that might affect your installation. If needed, install a vapor barrier or apply a special curing compound to protect against moisture issues.
Clean the surface thoroughly to remove all contaminants, dust, and debris. For installations over 3000 square feet, identify at least two grounding points and plan your copper strip placement at 1000-square-foot intervals. This grounding grid layout must effectively dissipate static electricity and meet your end user's specific requirements.
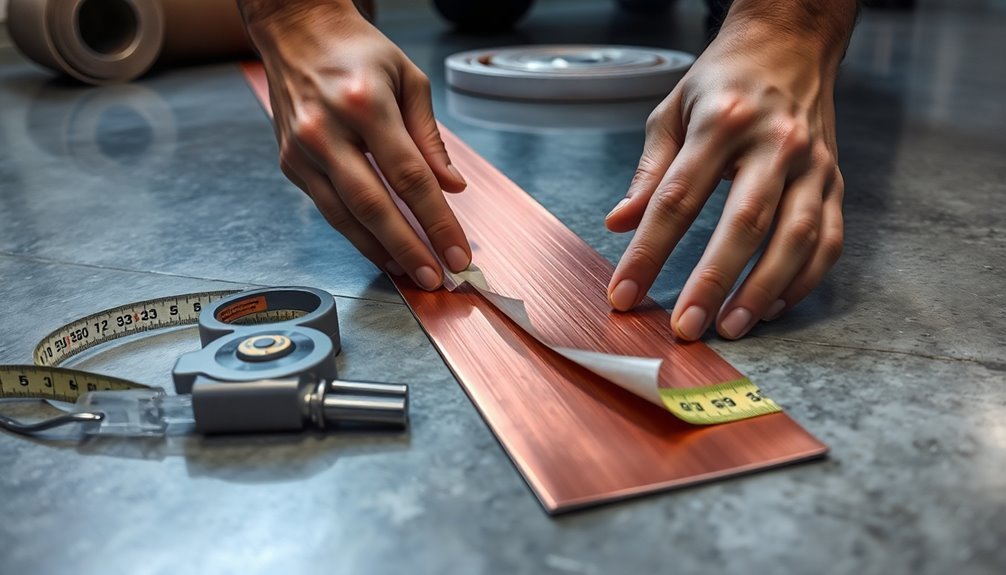
Required Tools and Materials
You'll need specialized flooring equipment like a marble cutting saw, laser level meter, and suction plate device to properly install anti-static floor strips.
The key materials include ESD flooring tiles, copper tape, conductive adhesives, and GroundBridge strips to create a complete grounding system. For optimal grounding, twelve copper strips should be placed per 1000 square feet of flooring.
Testing tools such as a megohmmeter and moisture probes are also essential to verify proper installation and conductivity throughout the process. A blister level meter helps ensure precise horizontal alignment during the layout phase.
Essential Installation Equipment
Successful installation of anti-static floor strips depends upon having the right tools and materials on hand from the start.
You'll need to gather equipment across several categories to guarantee proper installation and conductivity of your anti-static flooring system. It's important to ensure your workspace has proper ventilation during the installation process. Using Flexco Welding Beads ensures proper fusion between floor tiles for a seamless finish.
- Preparation tools include a marble cutting saw for precise cuts, laser level meter to guarantee proper leveling, and cleaning equipment like vacuum cleaners and mops to maintain a dust-free work area.
- Floor laying equipment requires specific items such as a suction plate device for positioning, nut adjustment handles for height modifications, and a weighted roller to guarantee proper adhesion.
- Conductive components are vital – you'll need conductive adhesive, copper tape for creating the grounding grid, and a megohmmeter to test resistance between copper foils.
- Safety and precision tools round out your equipment list, including knee pads, safety goggles, and measuring tools like tape measures and ink lines.
Don't forget essential power tools like an electric drill for anchoring and a hot welder for seam connections.
Having these tools readily available will streamline your installation process and guarantee proper anti-static floor performance.
Key Materials Needed
Along with proper installation equipment, selecting the right materials determines the effectiveness of your anti-static floor system.
You'll need conductive adhesives like GroundTack or Polyflor conductive adhesive to secure your flooring materials. These adhesives guarantee proper electrical conductivity throughout the installation.
Copper strips are essential components, and you'll need to plan for one strip per 1000 sq. ft. of floor space. Place these strips at the periphery and along the diagonal of areas larger than 40 m2, making sure they're properly earthed every 40 m2.
Don't forget the conductive primer, which creates the necessary pre-coating for dissipative and conductive flooring types.
Your main flooring materials will consist of ESD carpet tiles, vinyl sheets, or conductive rubber, depending on your specific needs.
You'll also need a proper grounding system that includes copper or GroundBridge strips to connect your flooring to earth ground.
Additional materials include cementitious underlayment for solid subfloors, moisture barriers for concrete slabs, and tactiles for joining carpet tile corners if you're creating a floating floor system.
Planning Your Strip Layout
Proper strip layout forms the foundation of an effective anti-static floor installation.
One strip connection is required for each 1000 square feet of ESD flooring to ensure proper grounding.
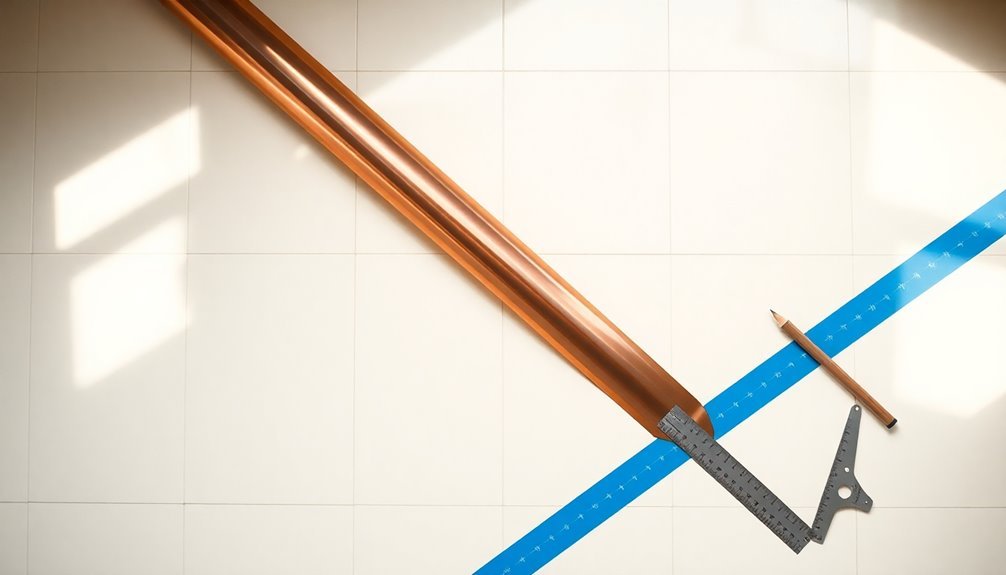
You'll need to create a 600mm square grid across the floor, keeping perimeter strips 150mm from the walls. Start by laying the earth strip 150mm from one side, following the intended direction of your vinyl sheets. Then, place a second strip at a 90° angle, running the full width of the room.
For maximum conductivity, follow these critical measurements:
- Space additional strips at 20-meter intervals throughout the room
- Use stainless steel strips that are 50mm wide and 0.2mm thick
- Install 2 linear meters of copper strip for every 40m² of flooring
- Leave 15cm of strip exposed for electrical connections
When laying the strips, embed them in adhesive after applying the conductive pre-coating at 100-150 gr/m².
If you're using a dual component reactive adhesive, skip the conductive primer. Remember to create ring earthing 10cm from the walls, and make sure the strips remain visible through telegraphing for future identification.
The adhesive's electrical resistance should measure between 5 x 10⁴ and 10⁷ Ohms for proper conductivity.
Ground Terminal Installation
You'll need to install ground terminals at specific intervals, with one copper grounding strap required for every 1000 square feet of ESD flooring and at least one strap per room.
To properly ground each terminal, remove the AC outlet cover's center screw, attach the copper grounding strap to the outlet's grounding screw, and run it down to the subfloor.
After installation, you must test the ground connection using a volt ohm meter to confirm proper conductivity and compliance with ANSI/ESD S6.1 standards. Cover the installed copper strap with conductive adhesive material to ensure proper bonding and conductivity.
Terminal Spacing Requirements
Ground terminal spacing plays a critical role in ESD floor installation effectiveness. You'll need to follow specific requirements based on whether you're installing conductive or dissipative flooring.
For conductive flooring, create a grid pattern using stainless steel earth strips at 600mm squares, placing them 150mm from walls with additional strips every 20 meters across the room.
For dissipative flooring, you'll need fewer grounding points, with a minimum of two terminals and additional points for every 3,000 square feet. Install copper strips at a rate of one per 1,000 square feet, making certain each strip runs at least 6 feet parallel to the wall.
Key spacing requirements you must follow:
- Position the first strip 150mm from one side of the room in the direction of vinyl sheets.
- Install copper strips with at least 2 inches contacting the grounding strip or conductive subfloor.
- Place terminals every 600mm for conductive flooring in a grid pattern.
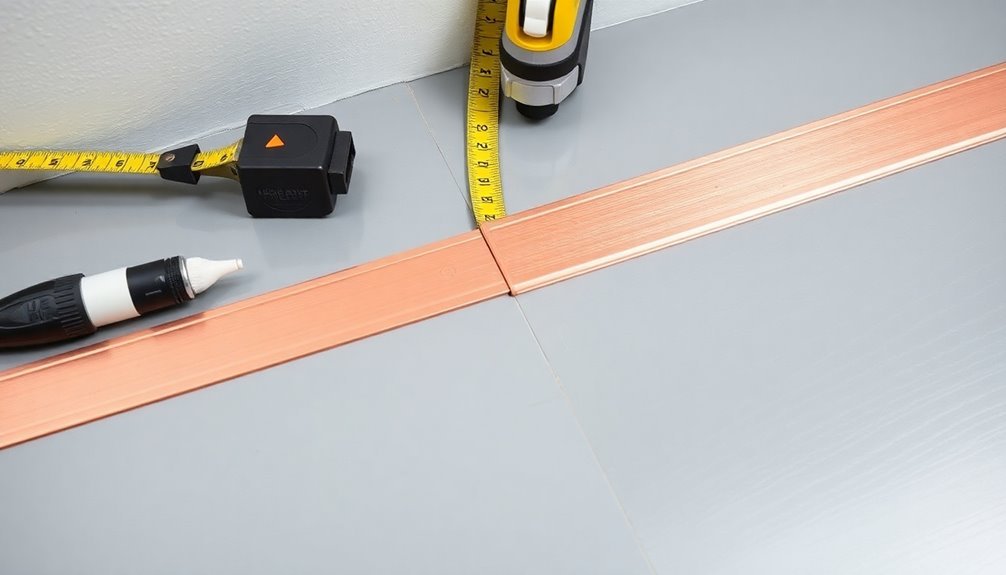
- Make sure strips are visible after installation for easy location and maintenance.
Remember to take into account your specific flooring material, as it'll determine the exact spacing requirements. Conductive flooring needs a denser grid, while dissipative flooring can have more space between grounding points.
Proper Grounding Techniques
When installing anti-static floor strips, establishing secure ground terminals forms the foundation of an effective ESD protection system. You'll need to start by identifying a reliable ground terminal source, typically an electrical outlet or designated grounding point. Place copper strips along the floor, maintaining a 150mm distance from walls, and connect them to your earth point using appropriate grounding screws or clips.
Before installation, clean the subfloor thoroughly and apply conductive primer if needed. You'll want to embed the copper strips securely in conductive adhesive while keeping them visible for future inspections. Remember to insulate the strips from any metal fixtures to prevent interference.
| Installation Step | Key Requirements |
|---|---|
| Ground Source | Electrical outlet or designated ground point |
| Strip Placement | 150mm from walls, 20m intervals |
| Adhesive | Conductive type, even application |
| Testing | Verify conductivity after installation |
Always guarantee qualified personnel handle the electrical connections and verify the system meets local codes. You'll need to protect the installation from moisture and contamination throughout the process. Regular maintenance inspections will help maintain the system's effectiveness over time.
Applying Conductive Adhesive
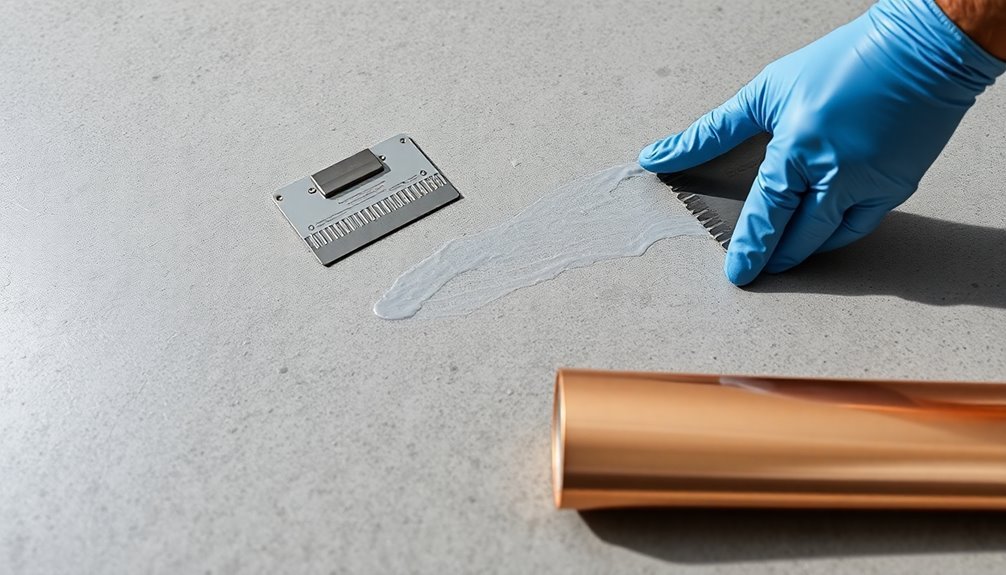
In accordance with manufacturer specifications, applying conductive adhesive requires careful attention to coverage and technique.
You'll need to use a conductive adhesive specifically designed for anti-static flooring, guaranteeing it's compatible with your specific flooring material and provides stable electrical resistance over a 10-year service life.
Using a foam roller or spreader, apply the adhesive uniformly across the subfloor at a rate of 100-150 gr/m2.
Don't rush this process, as uneven coverage can compromise the floor's conductivity. For dual component reactive adhesives, remember that you shouldn't apply a conductive primer in aqueous phase.
Here's what you must check before applying the adhesive:
- Test the subfloor's moisture content and guarantee it's properly leveled
- Verify the room's temperature and humidity meet manufacturer specifications
- Confirm the adhesive's compatibility with your specific flooring type
- Guarantee all necessary standards compliance (NF EN 13 415, NF EN 1081, ASTM F 150)
Allow the adhesive to dry according to the manufacturer's recommended timeframe before laying the flooring.
Clean any spills or excess adhesive immediately to prevent installation complications and maintain proper conductivity.
Laying Copper Foil Strips
Proper installation of copper foil strips forms the foundation of an effective anti-static floor system.
You'll need to create a grid pattern across the floor, starting with perimeter strips placed 150mm from the walls. Lay the strips in the same direction as your planned vinyl sheets, and install additional strips at 20-meter intervals throughout the room.
When installing the copper strips, you'll need to secure them with conductive adhesive and verify they're firmly pressed against the subfloor. The first strip should extend from one wall, while a second strip should be laid perpendicular to it, creating a 90-degree angle. Each strip should be connected to at least two earth points for proper grounding.
For areas near pipes or metal fixtures, cut the conductive flooring 50mm short and fill these spaces with standard vinyl using non-conductive adhesive.
You'll need to weld these infill pieces to the ESD floor covering using a standard weld rod. Remember to insulate any pipes or metal projections from the conductive floor covering to maintain system integrity.
Always confirm the grid layout with your end-user, as military specifications may vary.
Grounding System Connection
After securing your copper foil grid, establishing effective grounding connections becomes your next priority.
You'll need to connect your anti-static flooring to a reliable ground source, with the AC equipment ground being the preferred method. Remember that you'll need one copper grounding strap for every 1,000 square feet of ESD flooring, and each room must have at least one grounding point.
For a proper grounding connection to an electrical outlet, follow these essential steps:
- Select a standard AC outlet (avoid isolated ground receptacles as they can compromise the system's effectiveness)
- Remove the outlet cover plate and locate the grounding screw inside
- Create a small hole in your copper grounding strap and secure it to the outlet using the grounding screw
- Test the connection with a volt ohm meter to verify proper continuity
If you're using ground plates, install two plates for the first 500 square feet, then add more based on your total floor area.
For areas up to 5,000 square feet, add one plate per 500 square feet. Always bond any auxiliary grounding systems to your AC equipment ground when possible to maintain system integrity.
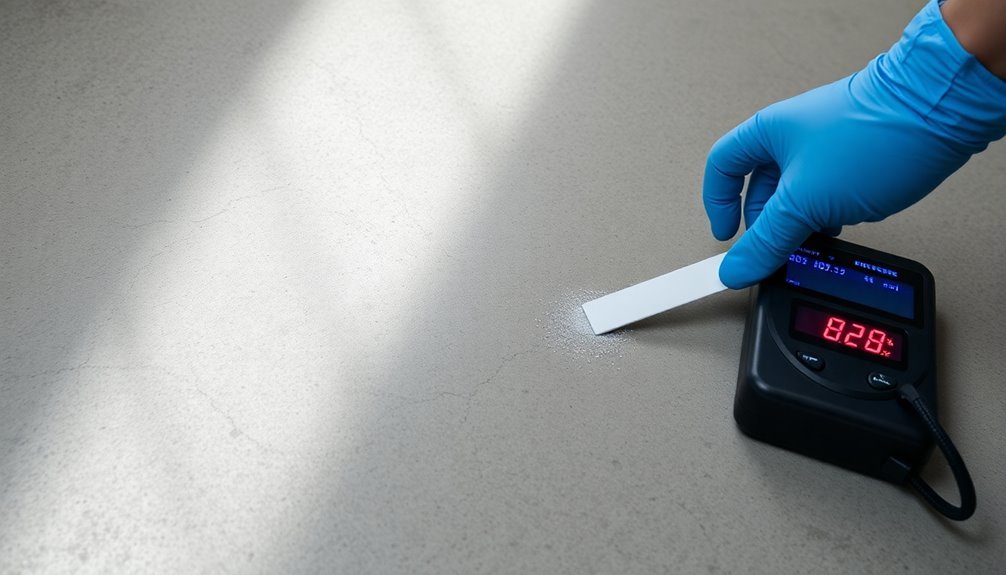
Testing Electrical Conductivity
Testing your anti-static floor's electrical conductivity represents a crucial final step in the installation process.
You'll need to verify that your flooring meets specific resistance requirements: conductive flooring should measure between 5 x 10^4 and 10^7 Ohms, while dissipative flooring should range between 10^7 and 10^9 Ohms.
You'll need to use a megohmmeter and follow one of several testing standards, such as NF EN 13 415-NF EN 1081 (tripod method) or ASTM F 150.
Before testing, confirm the floor is clean and dry to get accurate readings. Document all test results for your records.
If you encounter conductivity issues, check for gaps in adhesive application, verify proper installation of the conductive pre-coating, and inspect the copper strips for damage.
Make certain all grounding points are securely connected to earth. After any repairs, you'll need to retest the area.
Remember that maintaining electrical conductivity is an ongoing process.
You should perform regular testing to confirm your flooring maintains its electrical properties over its expected 10-year lifespan.
Always follow manufacturer guidelines and comply with local regulations for testing procedures.
Maintenance and Care Guidelines
Regular maintenance protocols guarantee your anti-static floor strips maintain their protective qualities over time.
You'll need to focus on consistent cleaning practices while avoiding certain products that could compromise the floor's conductivity. By following proper maintenance procedures, you can considerably extend the life and effectiveness of your anti-static flooring system.
To maintain peak performance, follow these essential care guidelines:
- Clean your floors daily with a vacuum or broom to remove dirt and debris that can interfere with electrical conductivity.
- Use only mild detergents with warm water when mopping, and verify you're thoroughly rinsing your mop to prevent residue buildup.
- Never apply waxes or polishes, as these create insulating layers that defeat the static control properties.
- Conduct monthly inspections to identify and repair any damaged strips or tiles promptly.
When you notice any signs of wear or damage, don't delay repairs.
Replace damaged sections immediately to maintain proper electrical continuity throughout the floor system. Keep detailed maintenance records and always refer to your manufacturer's specific guidelines for cleaning products and methods.
If you're using cleaning equipment, confirm it's approved for use on anti-static flooring to prevent accidental damage.
Frequently Asked Questions
Can Anti-Static Floor Strips Be Installed Over Existing Carpeting?
You shouldn't install anti-static floor strips over existing carpeting. Instead, you'll need to integrate the strips into your floor system, placing them beneath your carpet to guarantee proper conductivity and functionality.
How Long Should Facility Operations Pause During Strip Installation?
You'll need to pause operations for 24-48 hours. The exact time depends on your installation method, floor size, and whether you're using quick-set or standard adhesives and primers.
Do Temperature and Humidity Affect the Installation Process?
Yes, you'll need to maintain temperatures between 15-25°C and humidity levels of 40-60% during installation. If conditions aren't right, your adhesive won't cure properly and your strips may fail to bond correctly.
What's the Typical Lifespan of Anti-Static Floor Strips?
You'll typically get 6 to 24 months from anti-static floor strips, depending on your maintenance practices, floor type, and environmental conditions. With proper care and professional installation, they'll last toward the longer end of that range.
Can Anti-Static Strips Be Painted Over Without Losing Conductivity?
Yes, you can paint over anti-static strips while maintaining conductivity. Just make certain you're using compatible paint and don't block the electrical connection points. It's best to test conductivity after painting to confirm effectiveness.
In Summary
You've now learned how to properly install anti-static floor strips to protect your sensitive equipment. Remember to regularly test the conductivity and keep the strips clean for peak performance. Don't forget to document your installation layout and grounding points for future reference. With proper maintenance and periodic inspections, your anti-static floor system will provide reliable static protection for years to come.


Leave a Reply