To set up a reliable ESD workbench, you'll need to follow these key steps: Install a proper grounding system with a common point ground, use an ESD mat with 0.1-1000 MegaOhm resistance, and secure all connections with metallic crimps or snaps (not alligator clips). Connect your wrist strap and equipment to the same ground point, maintain workspace humidity between 40-60%, and test all components monthly. Don't forget ESD-safe tools, proper documentation of testing results, and floor protection with grounded mats. Keep your workspace organized and free of static-generating materials. These fundamentals are just the beginning of creating your complete ESD-protected workspace.
Proper Grounding System Installation
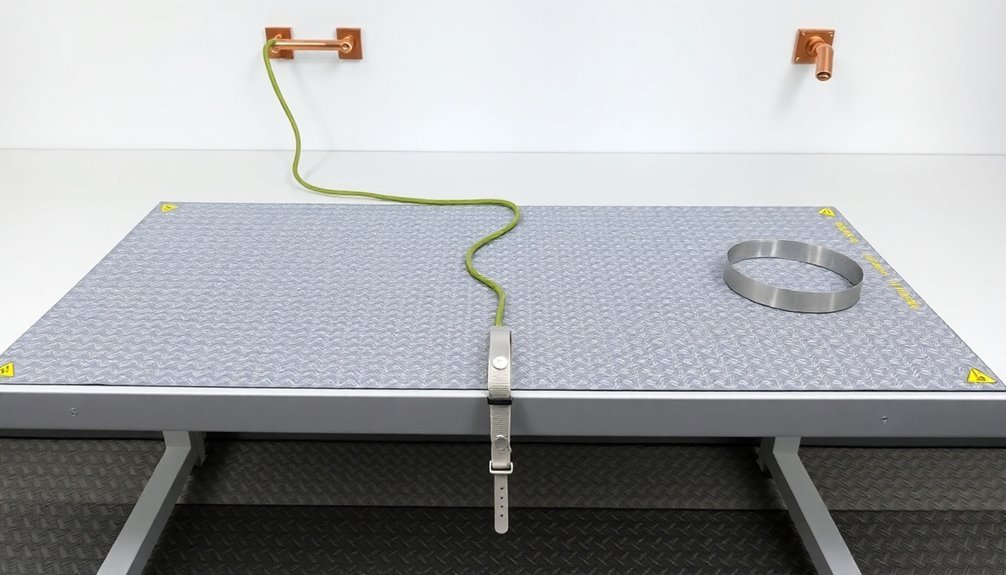
In order to establish a reliable ESD workbench, you'll need to start with proper grounding system installation. Begin by connecting your worksurface mat grounding cord to both the mat and a verified ground point, using secure connecting devices like metallic crimps, snaps, or banana plugs. Don't use alligator clips, as they won't provide reliable grounding connections. Since static electricity can damage sensitive components, proper ESD protection is essential when handling electronic devices.
Install an Earth Bonding Point (EBP) at your workstation, connecting it directly to the equipment ground. Place this common ground point along the side edge or back of your bench-top, ensuring it's accessible and can accommodate multiple workers when needed. This setup will maintain all conductive components at the same electrical potential. A properly implemented grounding system should maintain 1 to 10 megohms of resistance for optimal charge dissipation.
You'll need to properly ground your floor mat by laying it flat with the connector facing the workbench. Connect the floor mat's grounding wire to both the mat and an earth bonding plug. When using the floor mat, wear heel grounders on both feet for continuous grounding.
Remember to test all workstation grounds, including personal grounding components like wrist straps and foot grounders, to verify proper resistance before beginning work with ESD-sensitive items.
ESD Mat Selection and Placement
Now that you've established proper grounding, selecting and placing the right ESD mat will maximize your workbench's effectiveness. Choose a mat with resistance between 0.1 and 1000 MegaOhm (MΩ) to guarantee proper static dissipation.
Consider your specific application needs, including surface texture and thickness, to match your work requirements. Three layer vinyl mats provide superior electrical properties while offering cushioning for enhanced comfort. The most durable vinyl mats feature UV inhibitors for long-lasting protection.
When selecting your mat, evaluate the construction material carefully. Rubber and vinyl options offer different properties, and you'll need to match these with your workspace demands.
Don't forget to factor in your budget while confirming the mat meets quality standards and offers adequate protection for your ESD-sensitive components.
For proper placement, verify your mat covers the entire work surface. You'll need to connect it securely to your grounding system using appropriate Earth Bonding Points (EBPs) and grounding leads.
Install the mat flat against the surface, avoiding any air pockets or wrinkles that could compromise its effectiveness.
Remember to verify that your chosen mat complies with industry regulations and can withstand your workspace's environmental conditions, including exposure to heat and chemicals.
Regular maintenance will extend your mat's lifespan and maintain its protective properties.
Common Point Ground Setup

Establishing a common point ground serves as the foundation of your ESD protection system. To set up a proper common point ground, you'll need to connect all ESD elements to the same grounding point, typically the equipment ground or the center screw of a standard 110VAC outlet.
When installing your system, start by connecting your ground cords to the worksurface mat, then to the common point ground. You'll want to use reliable ground cords with secure connecting devices like metallic crimps, snaps, or banana plugs. Always ensure that you connect both cords through the center screw when securing multiple ground connections. The work surface resistance should be maintained at less than 1x10E9 ohms.
Make certain you've got multiple ground points available if you're setting up a workspace for additional workers or supervisors. Keep your ground wires tidy by securing them to the bench to prevent tripping hazards and maintain organization.
Before using your workstation, test all ground points to verify continuity. Install a Ground Fault Circuit Interrupter (GFCI) for added personnel protection.
Remember to connect everything – from floor mats to wrist straps – to the same common point ground to prevent unwanted discharges. Regular testing of your ground connections guarantees ongoing compliance with ANSI/ESD S20.20 and EOS/ESD S6.1 standards.
Wrist Strap System Requirements
You'll need to connect your wrist strap to a designated common ground point or equipotential bonding point, never directly to a dissipative mat unless it's specifically marked as the grounding point.
Before each work session, you must test your wrist strap system to confirm it meets the resistance requirement of less than 35 megohms, as specified by ANSI/ESD S20.20 standards.
A current limiting resistor is built into the ground cord to protect the operator in case of accidental contact with live electrical circuits.
Both elastic and metal wristbands provide reliable grounding protection when properly worn and maintained.
If you're not using continuous monitoring, daily testing of your wrist strap becomes essential to verify both proper grounding connection and skin contact.
Proper Grounding Connection Methods
The proper setup of wrist strap systems stands out as the most critical component in ESD workbench grounding. You'll need to establish a common point ground at the edge or back of your workbench, guaranteeing it's properly identified with an ANSI/ESD S8.1 symbol and connected to the equipment grounding conductor.
When setting up your grounding connections, you must follow these essential steps:
- Connect all conductive components, including work surfaces and equipment, to the same electrical ground point using metallic crimps, snaps, or banana plugs – avoid alligator clips.
- Verify your ground resistance falls within 1.0 x 10^6 to 1.0 x 10^9 ohms for ideal protection.
- Install multiple ground points if you have additional workers or ESD control elements.
- Link your floor mats to the ground using dedicated floor mat grounding cords.
For proper personnel grounding, you'll need to wear a wrist strap that meets ANSI/ESD S20.20 standards and connects directly to your common point ground. The wrist strap system must include both a wristband and a ground cord.
Remember to maintain and test your wrist straps regularly to verify they're functioning correctly and providing consistent protection against ESD damage.
Daily Testing Procedures Required
Daily testing of wrist strap systems forms the cornerstone of effective ESD protection protocols. You'll need to test your wrist straps at designated stations or use continuous monitors to guarantee proper functionality. Regular testing helps identify common issues like broken wires, dirty cuffs, and high skin resistance before they cause ESD damage.
| Testing Method | Key Benefits | Main Requirements |
|---|---|---|
| Test Stations | Provides resistance measurements | Daily manual testing and logging |
| Continuous Monitors | Immediate problem notification | Initial setup and verification |
| Combined Systems | Complete protection coverage | Regular calibration checks |
When you're testing your wrist strap system, don't forget to wiggle the coil cord area to detect intermittent failures. Pay special attention to the current-limiting resistor location, as it's a common point of failure. If you're using a test station, you'll need to document your results as part of your ESD control plan. However, if you opt for continuous monitors, you won't need to record test results manually. These monitors can also verify your work surface's ground connection, offering thorough protection throughout your shift.
Resistance Specifications Standards
Building on proper testing procedures, specific resistance standards must be met for effective ESD protection. You'll need to verify your workbench components comply with industry standards to maintain a safe working environment.
The ANSI/ESD S20.20 standard specifies that dissipation rates should fall between 10^6 and 10^9 ohms, while no lower limit exists for work surface resistance. Your wrist strap system requires a resistance of 1 megohm ±20 percent from the backplate to the common ground point.
Here are the key resistance specifications you must maintain:
- Work surfaces must measure less than 1 x 10^9 ohms per ANSI/ESD S4.1
- Conductive floor matting should have resistance below 1 x 10^6 ohms
- Homogeneous dissipative materials need volume resistance under 1 x 10^8 ohms
- Wrist straps should maintain 1 megohm resistance through their current limiting resistor
Remember to ground each ESD work surface individually to prevent daisy chaining. You can use either a GFCI or circuit breaker instead of a resistor in the ground cord for personal safety.
When setting up grounding points, verify they're properly connected to the earth protective ground and test them regularly to confirm compliance.
Floor Protection Fundamentals
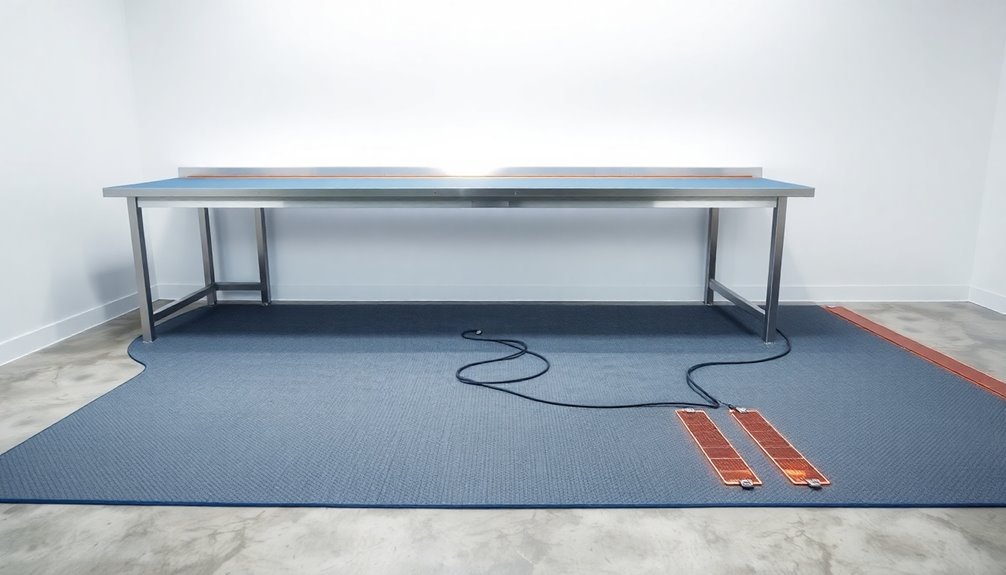
Proper floor protection sits at the heart of any effective ESD workbench setup.
You'll need to select between dissipative and conductive ESD floor mats based on your specific requirements. Dissipative mats need grounding every 1-4 tiles, while conductive mats require each tile to be grounded individually.
When installing your floor mats, you'll want to position them with the studs facing upward and connect the grounding cord securely. It's vital to test all ground connections to guarantee they're functioning correctly.
Don't forget that both your flooring and footwear work as a system – you'll need heel grounders for mobile operations, and they must be worn on both feet for continuous protection.
Maintaining your floor protection system isn't complicated, but it's important. You'll need to clean your mats regularly using specialized cleaners like Reztore ESD Surface and Mat Cleaner.
Don't use household cleaners as they can leave insulative residues that compromise your ESD protection. After cleaning, always test the surface to confirm you've removed all contaminants and verify that your ground connections remain secure and functional.
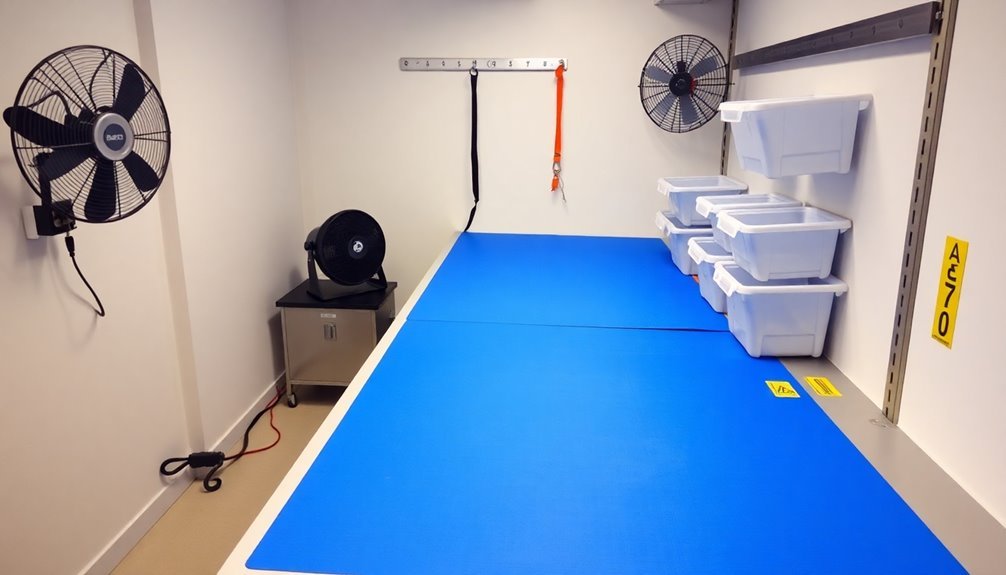
Environmental Control Methods
You'll need to check your workspace humidity levels daily using a calibrated hygrometer, ensuring levels stay between 40-60% for ideal ESD protection.
Implement air ionization by mounting overhead ionizers above your workbench and positioning bench-top units strategically to neutralize static charges effectively.
Maintain your workspace temperature between 70-75°F (21-24°C) to support proper humidity control and prevent condensation that could affect sensitive components.
Monitor Humidity Levels Daily
For effective ESD control, monitoring humidity levels on a daily basis is essential since environments below 30% relative humidity considerably increase static charge buildup risks.
While you'll want to maintain RH between 30% and 60% for ideal protection, your ESD control items must still function effectively even at humidity levels below 12%.
To properly monitor and maintain appropriate humidity levels in your workspace:
- Install automated monitoring systems rather than relying on manual recordings – they'll provide more reliable data and can alert you when RH drops to concerning levels.
- Consider setting up micro-climate zones throughout your facility, as different areas may require targeted humidification due to varying machinery and processes.
- Maintain detailed records of both humidity and temperature measurements to verify your ESD control measures' effectiveness.
- Test all ESD control items at 12% ± 3% RH and 23°C ± 3°C during qualification.
Remember that while higher humidity helps reduce ESD events by lowering surface resistance on work surfaces, it won't eliminate the risk entirely.
You'll still need to implement proper ESD grounding and other control measures regardless of your facility's humidity levels.
Air Ionization Implementation Steps
Implementing effective air ionization across your workbench starts with understanding the core requirements for placement and functionality.
You'll need to select an ionizer type that matches your workspace constraints and application needs, whether it's a benchtop unit for localized coverage or an overhead system for broader protection.
Position your ionizer to guarantee unobstructed airflow across static-sensitive areas. For benchtop ionizers, place them within 2-3 feet of your work area, angling the airflow toward where you'll handle components.
If you're using overhead ionizers, mount them directly above the work surface while avoiding any obstacles that could block ion distribution.
Maintain your ionization system by regularly cleaning emitter tips and checking for proper airflow.
You'll need to monitor decay times and ion balance to guarantee peak performance. Set up a maintenance schedule that includes weekly checks of the emitter points and monthly verification of ionizer performance.
Connect your ionization strategy with other ESD control measures.
Make sure the ionizer complements your existing grounding methods and follows ANSI/ESD S20.20 standards.
You'll want to document all installation parameters and performance metrics for compliance purposes.
Temperature Control Best Practices
Every ESD workbench requires precise temperature control, with ideal conditions maintained between 20°C and 25°C.
While humidity control isn't mandatory under ANSI/ESD S20.20 standards, maintaining proper temperature helps create a stable electrostatic environment and reduces ESD risks in your workspace.
To effectively manage temperature in your ESD workbench area, you'll need specialized equipment like humidifiers and dehumidifiers. These devices help you maintain consistent environmental conditions, especially when your facility experiences varying humidity levels throughout the year.
- Test your ESD control items at 23°C ± 3°C and 12% ± 3% relative humidity to verify they meet qualification standards.
- Monitor your facility's lowest annual humidity levels and qualify your ESD materials accordingly.
- Install proper ventilation systems to prevent static electricity buildup.
- Use environmental monitoring equipment to track temperature fluctuations in real-time.
Remember that temperature control is just one component of your ESD protection strategy.
While higher humidity levels can help minimize static charges, they won't eliminate ESD risks completely.
You'll need to maintain consistent temperature control as part of your thorough ESD control program, particularly during extreme weather conditions.
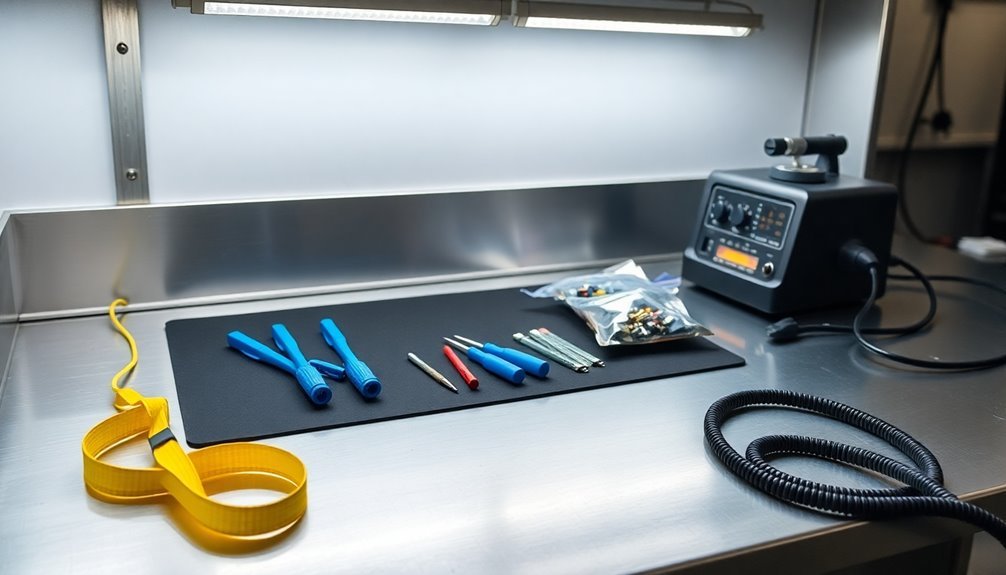
Essential Tools and Equipment
Setting up an ESD-safe workbench requires specific tools and equipment designed to prevent electrostatic discharge damage. You'll need ESD-safe gloves, wristbands, proper grounding systems, and specialized handtools to create a protected work environment.
| Essential Item | Key Requirements |
|---|---|
| ESD Gloves | Must be dissipative or conductive, available in handling and assembly types |
| Wristbands | Must connect to common point ground, channels static energy away |
| Handtools | Must be conductive or dissipative, grounded through worksurface |
Your workbench surface should have a resistance to ground between 1.0 x 10^6 and 1.0 x 10^9 ohms. You'll want to verify all components connect to the same electrical ground point for best protection. When selecting handtools, choose options specifically designed for ESD safety, such as conductive pliers, wire cutters, and tweezers.
Don't forget to regularly monitor your grounding systems and maintain proper signage in your work area. Your glove selection should match your specific needs – handling gloves for hazardous environments and assembly gloves for device protection. Remember that all these components work together as a system to protect sensitive electronic components from damaging static discharge.
Testing and Maintenance Schedule
To maintain a reliable ESD-protected workspace, you'll need to follow a consistent testing and maintenance schedule. Your monthly testing routine should include checking all components, from grounding points to wrist straps, while documenting results to track performance trends.
Don't overlook the importance of immediate equipment replacement when you spot signs of wear or malfunction.
Your maintenance routine must prioritize these critical tasks:
- Test your wrist strap systems completely, including the band, ground cord, and skin contact, using specialized testing equipment to verify proper resistance levels.
- Check all grounding connections to guarantee they're properly tied to the common point ground, avoiding any daisy-chain configurations that could compromise safety.
- Clean your ESD floors daily using appropriate cleaning products designed specifically for conductive surfaces.
- Monitor and maintain humidity levels between 40% and 60% using a hygrometer, employing humidifiers when needed.
Remember to maintain detailed logs of all testing activities and results. This documentation helps you identify patterns and address potential issues before they become serious problems.
Regular inspections of your entire ESD setup will help you catch and fix small issues before they lead to costly static damage.
Personnel Safety Protocols
In accordance with ESD safety standards, personnel must follow specific protocols to protect both themselves and sensitive electronic components. You'll need to wear proper ESD-safe equipment, including a wrist strap and heel grounders, which must be connected to your workstation's common point ground. Don't forget to wear your ESD-safe smock to shield against static charges from your clothing.
| Safety Item | Purpose | Testing Frequency |
|---|---|---|
| Wrist Strap | Personnel Grounding | Daily |
| Heel Grounders | Mobile Grounding | Each Shift |
| ESD Smock | Static Shielding | Weekly Check |
Before handling sensitive components, you'll need to verify that your grounding equipment is functioning correctly. Test your wrist strap and heel grounders using continuous monitors or testing devices at the start of each shift. Keep your workspace organized and free from static-generating materials. You must use only ESD-safe tools and equipment when working with sensitive electronics. If you're working with insulative materials, confirm that ionization equipment is properly positioned and functioning. Remember to follow your facility's standard operating procedures and maintain proper grounding connection throughout your work session.
EPA Zone Implementation
Every successful electronics facility requires a properly implemented ESD Protected Area (EPA) to safeguard sensitive components.
You'll need to carefully plan your EPA zone, whether it's a single workstation or an entire production floor, guaranteeing all surfaces and personnel maintain the same electrical potential.
When setting up your EPA zone, focus on these critical elements:
- Install static dissipative flooring with resistance less than 1.0 x 10^9 ohms, and connect your ESD work surface mat to a common ground point.
- Equip your personnel with proper grounding devices, including wrist straps and foot grounders for mobile workers.
- Remove all regular plastics and insulators from the area, or neutralize essential insulators using ionizers.
- Clearly mark EPA boundaries with appropriate signage and floor tape to alert everyone entering the zone.
Your EPA maintenance strategy should include regular inspections of all ESD control equipment and verification of proper grounding connections.
Don't forget to monitor humidity levels and use humidifiers when necessary.
Keep ESD storage containers readily available for transporting sensitive devices outside the protected area, and guarantee your team follows proper grounding protocols at all times.
Frequently Asked Questions
Can I Stack Electronic Components on an ESD Mat During Assembly?
You shouldn't stack electronic components on an ESD mat. Even with proper grounding, stacking increases the risk of ESD damage. Instead, arrange components in a single layer to maintain ideal protection.
How Often Should I Replace My ESD Wrist Strap Band?
You should replace your ESD wrist strap based on usage and testing results. While there's no fixed timeline, consider replacing it quarterly to annually, or immediately if you notice wear, damage, or failed tests.
Does Wearing Rubber-Soled Shoes Affect ESD Protection Effectiveness?
Yes, rubber-soled shoes greatly reduce ESD protection effectiveness. They're insulators that prevent proper grounding, putting your electronics at risk. You should wear ESD-safe footwear with conductive or dissipative soles instead.
Can I Use Regular Cleaning Solutions to Maintain ESD Mats?
No, you shouldn't use regular cleaning solutions on ESD mats. They'll damage the mat's conductivity properties. Instead, use only ESD-safe cleaning products or deionized water with a soft cloth for maintenance.
What Happens if Lightning Strikes Near an Esd-Protected Workstation?
You'll face risks from both direct and indirect effects. Lightning can create surges, damage sensitive electronics, and overwhelm your ESD protection systems. It's best to unplug equipment during storms for safety.
In Summary
Set up your ESD workbench with confidence now that you've learned these essential guidelines. You'll protect sensitive components and guarantee workplace safety by implementing proper grounding, using quality mats, and following testing protocols. Don't forget to maintain your equipment regularly and train your team on safety procedures. With these measures in place, you're ready to handle static-sensitive devices safely and efficiently.


Leave a Reply